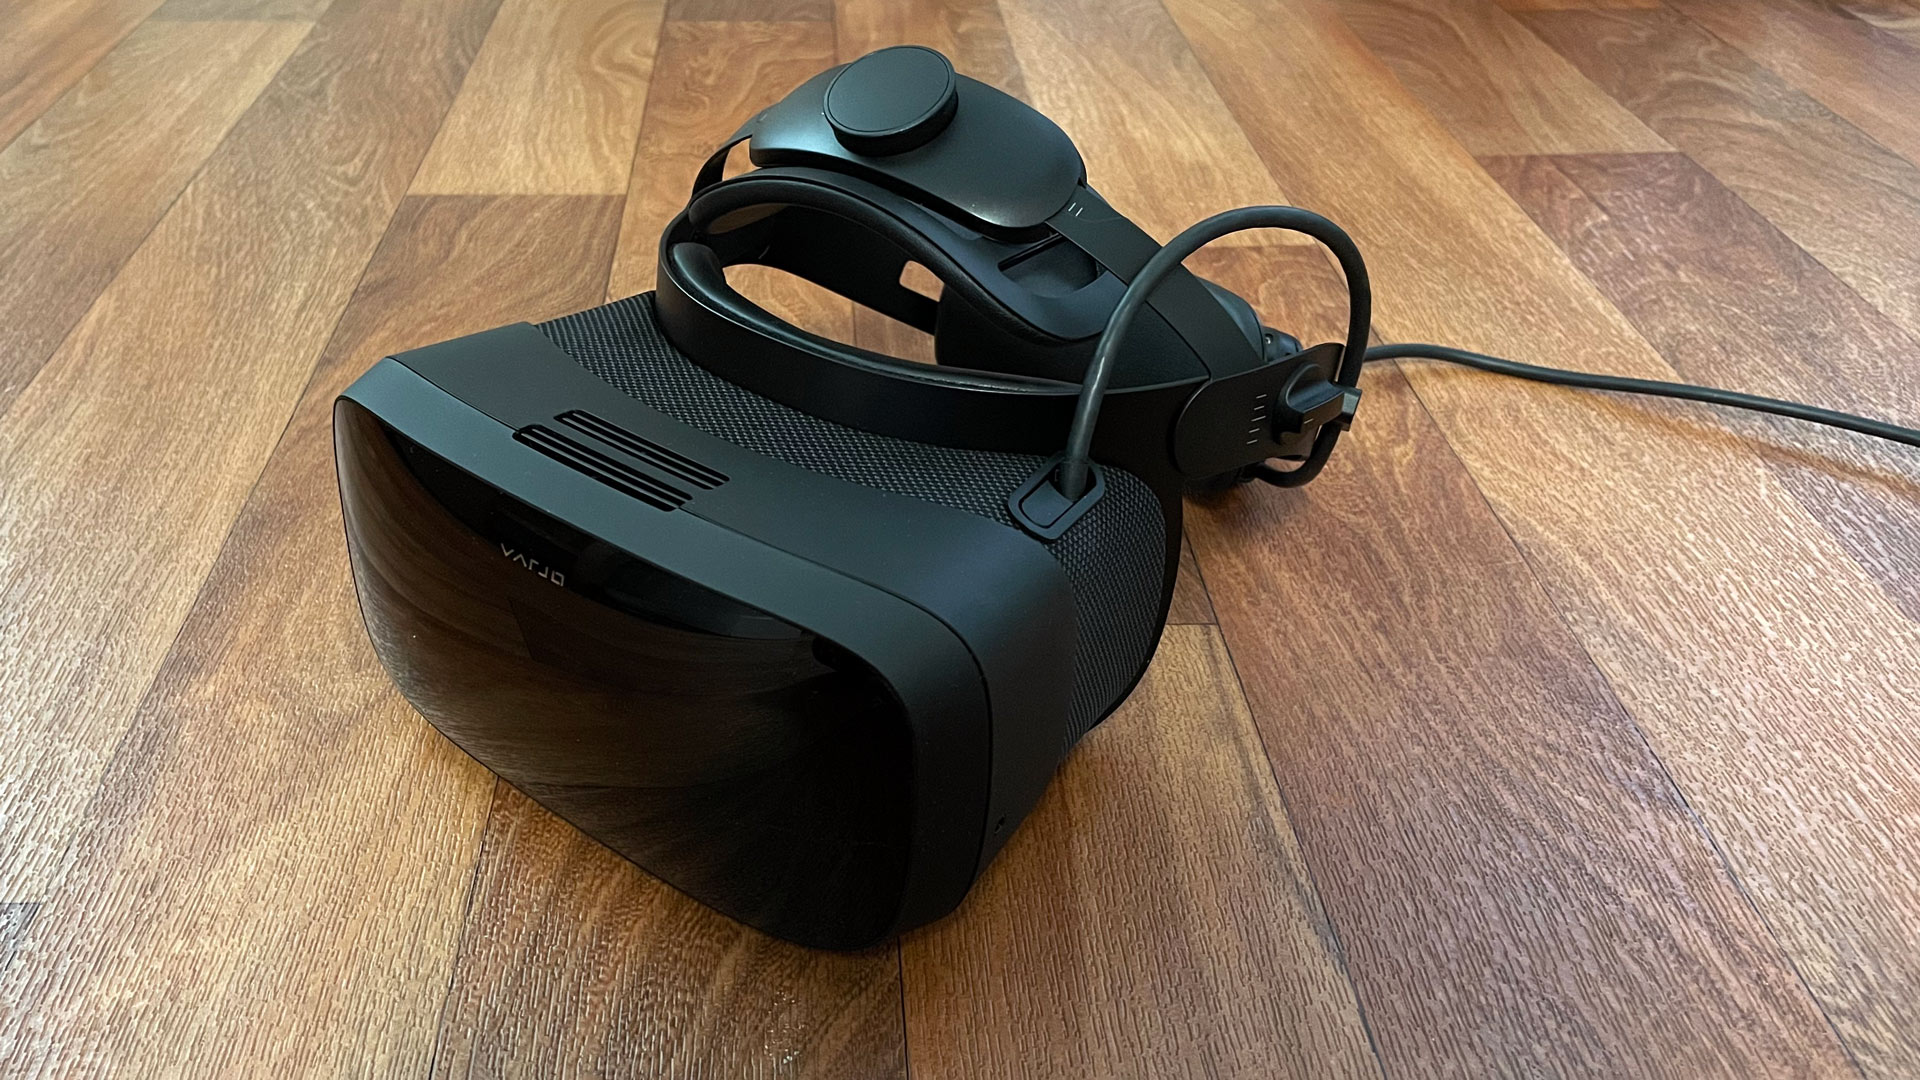
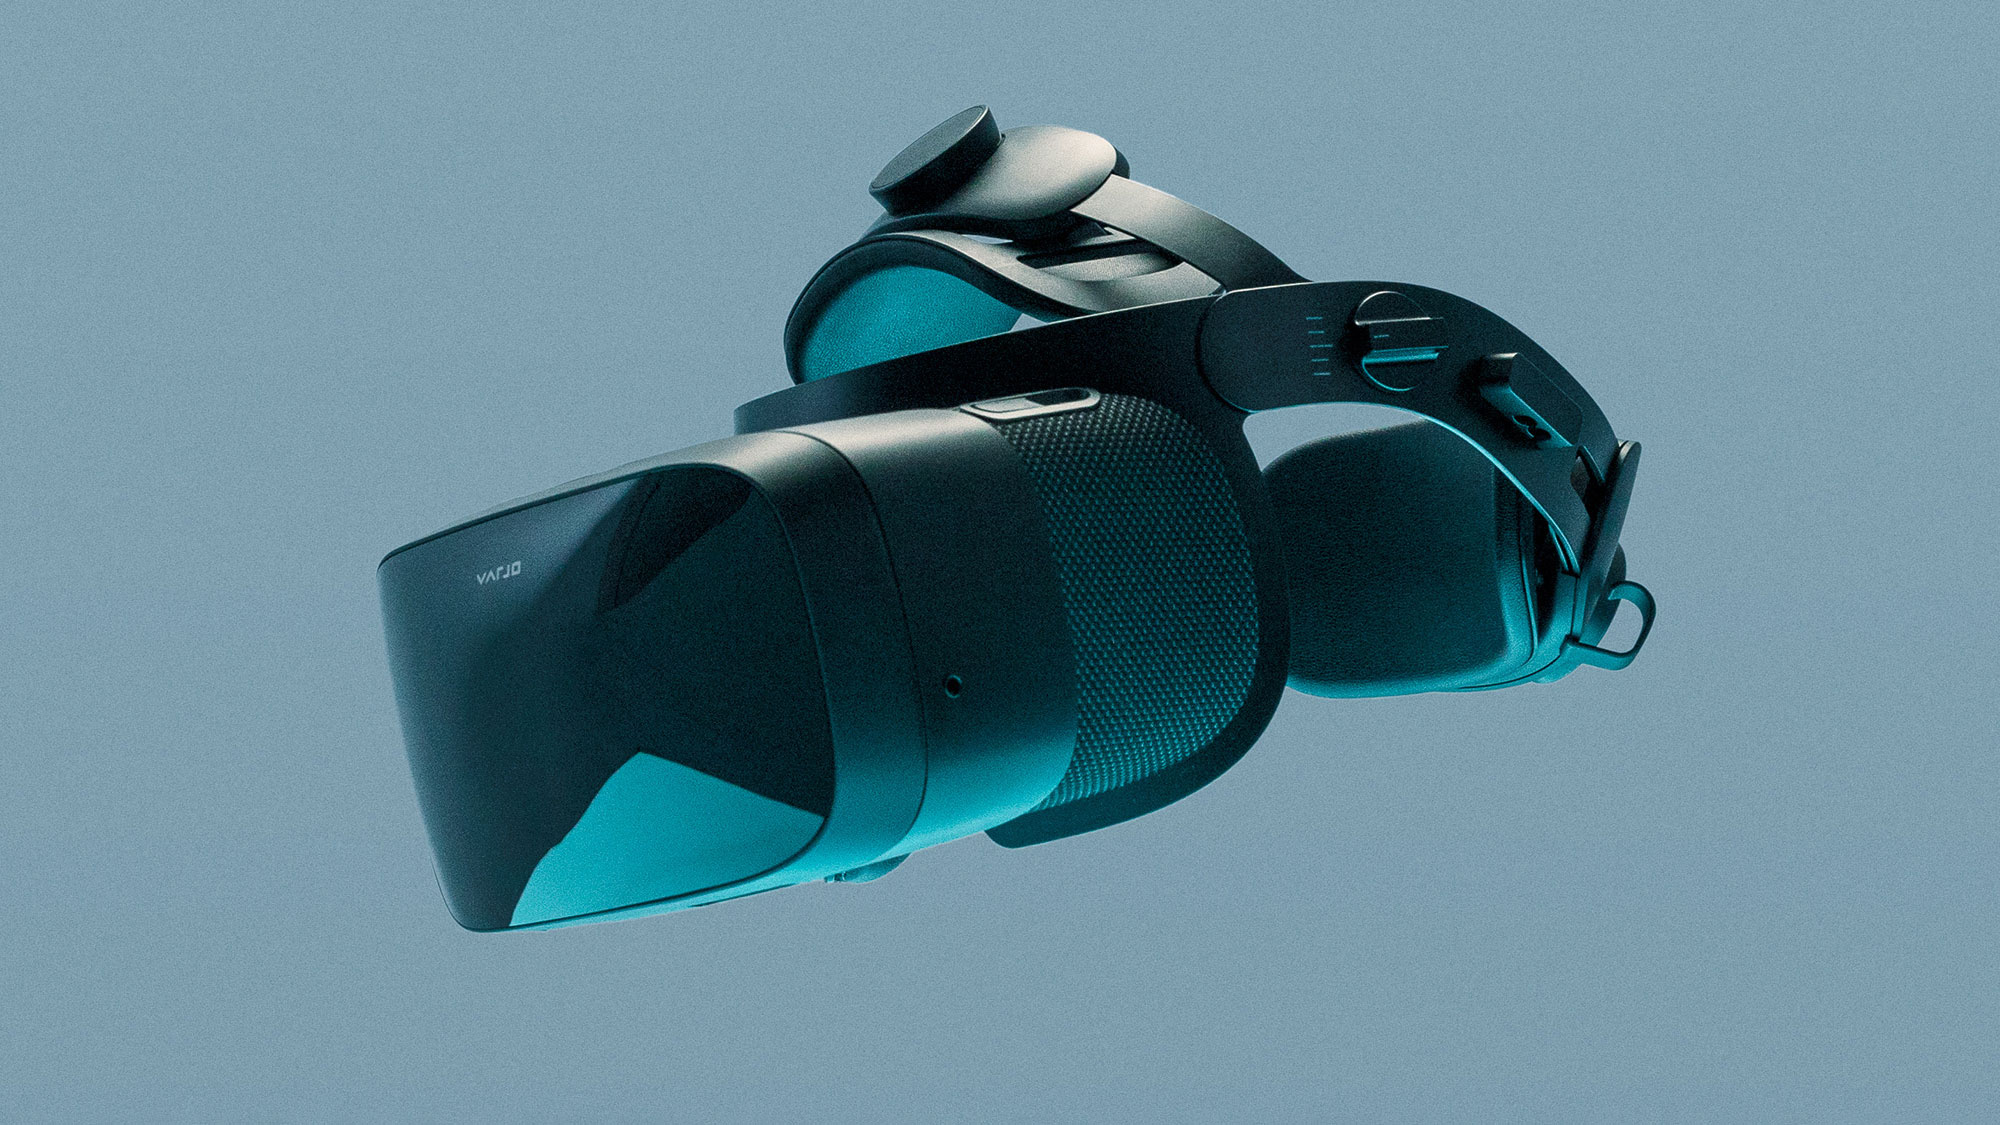
Varjo today announced Aero; while it’s the company’s most affordable headset yet, its $2,000 price point still limits its to businesses and wealthy enthusiasts. But with stunning clarity its sure going to be a dream headset for VR simmers who aren’t afraid to trade cash for immersion.
Varjo Aero is a pared down version of the company’s high-end enterprise headsets, notably without the ‘bionic display’ which gave the headset retina resolution at the center of the field-of-view. Even without the novel bionic display, Aero still offers stunning clarity (claimed to be 35 PPD) that’s beaten only by the company’s more expensive headsets. You can read up on the Aero’s announcement and release date here; let’s start with the full specs below:
Varjo Aero Specs |
|
| Resolution | 2,880 x 2,720 (7.8MP) per-eye, mini-LED LCD (2x) |
| Refresh Rate | 90Hz |
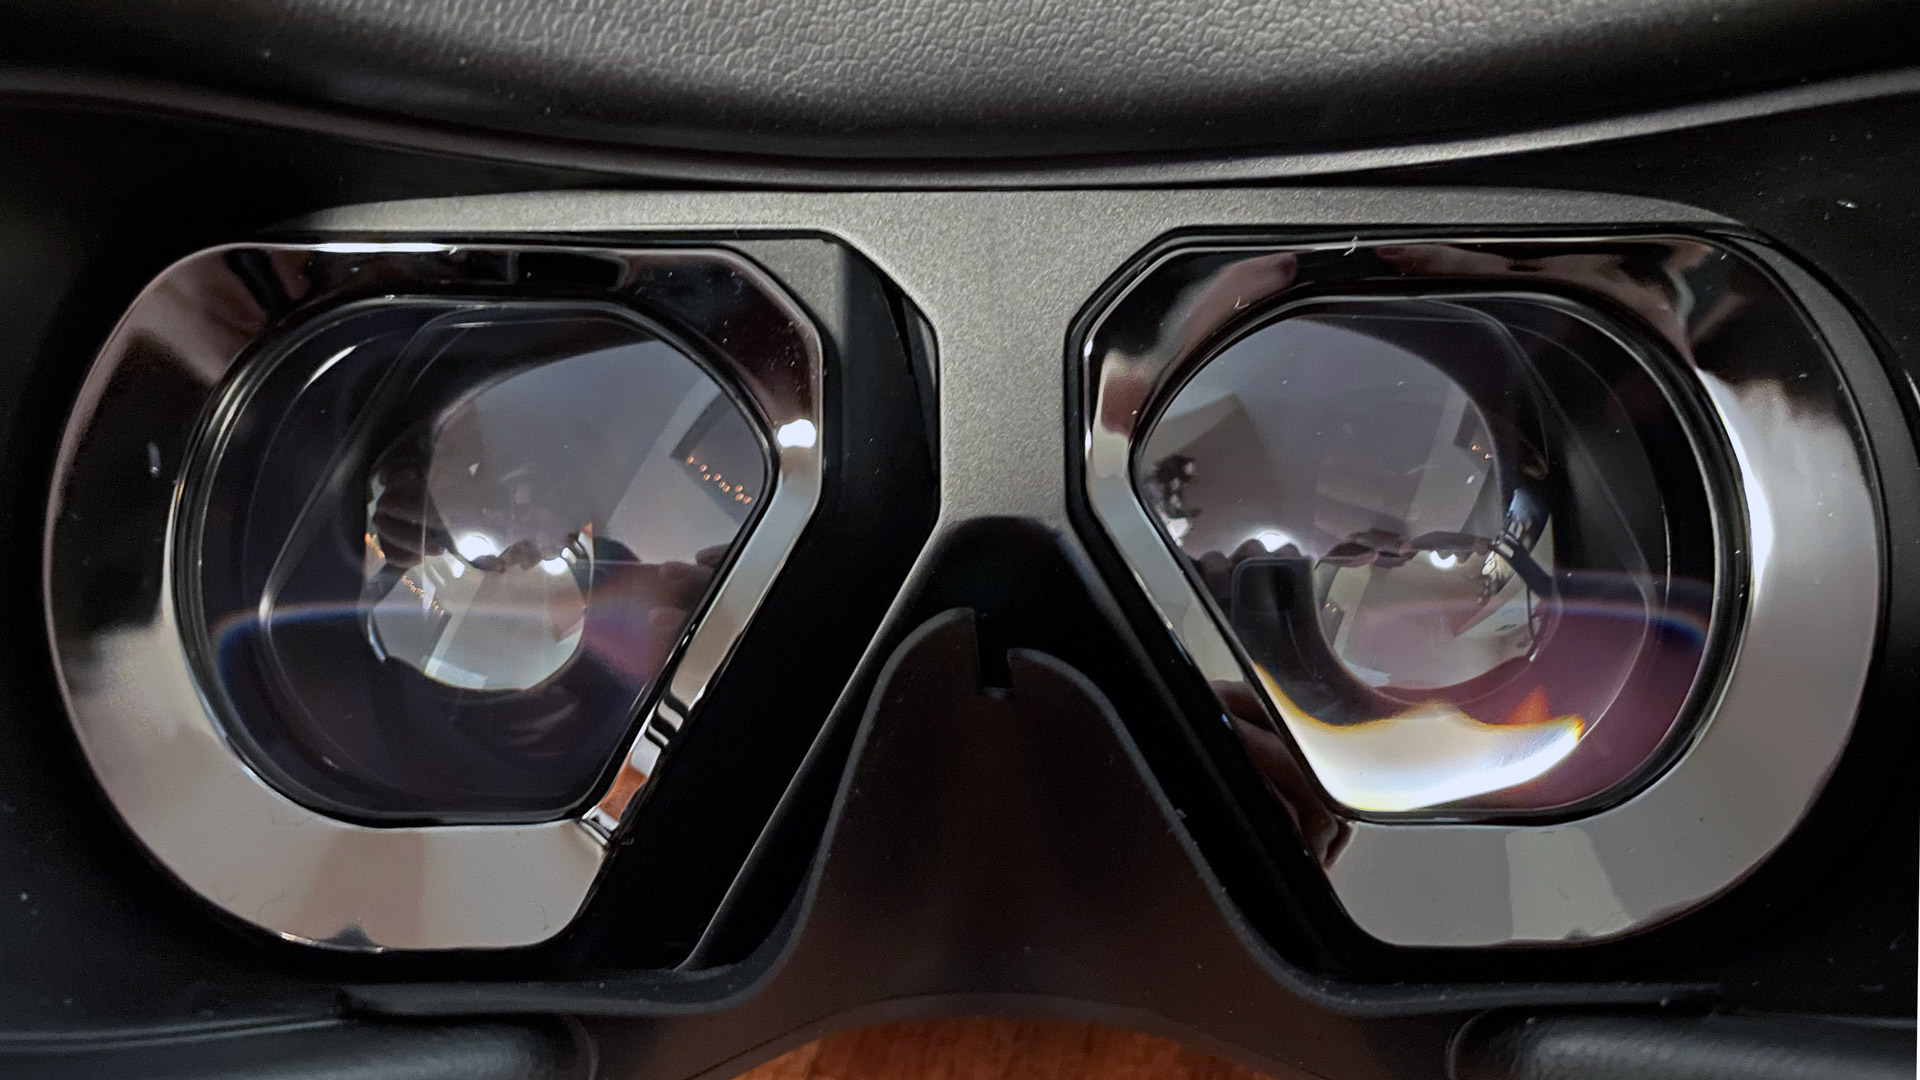
| Lenses | Aspheric |
| Field-of-view (claimed) | 134° diagonal, 115° horizontal (at 12mm eye-relief) |
| Optical Adjustments | IPD (automatic motor driven) |
| IPD Adjustment Range | 57–73mm |
| Connectors | USB-C → breakout box (USB-A 3.0, DisplayPort 1.4) |
| Cable Length | 5m |
| Tracking | SteamVR Tracking 1.0 or 2.0 (external beacons) |
| On-board cameras | 2x eye-tracking |
| Input | None included (supports SteamVR controllers) |
| Audio | 3.5mm aux port |
| Microphone | None (supports external mic through aux port) |
| Pass-through view | No |
| Weight | 487g + 230g headstrap with counterweight |
Varjo Aero Review
Before we dive in too deep, let’s take a look at where the Varjo Aero fits into the landscape of similar headsets from a price standpoint:
| Varjo Aero | Vive Pro 2 | Reverb G2 | Valve Index | |
| Headset Only | $2,000 | $800 | – | $500 |
| Full Kit | $2,580 | $1,400 | $600 | $1,000 |
| includes MSRP of Index controllers and 2x SteamVR Tracking base stations | ||||
To date Varjo’s headsets have been best known for their ‘bionic display’ system, which actually uses two displays per-eye, a large display to cover a wide field-of-view, and a smaller inset display with high pixel density which offers genuine retina resolution (60+ PPD) in the center of the headset’s field-of-view.
Varjo Aero does away with the smaller display and looses its true retina resolution, but even with just its large display it still retains a whopping 35 PPD and leading clarity over all non-Varjo headsets on the market.
Clarity

It wasn’t long ago that we saw the release of Vive Pro 2 and Reverb G2, with resolutions of 2,448 x 2,448 (6MP) and 2,160 × 2,160 (4.7MP), both of which have pretty impressive clarity.
And though Varjo Aero’s 2,880 x 2,720 (7.8MP) resolution doesn’t seem like that much more, it gets an extra clarity boost thanks to its aspheric lenses which all but eliminate glare and god-rays which are prevalent in other headsets.
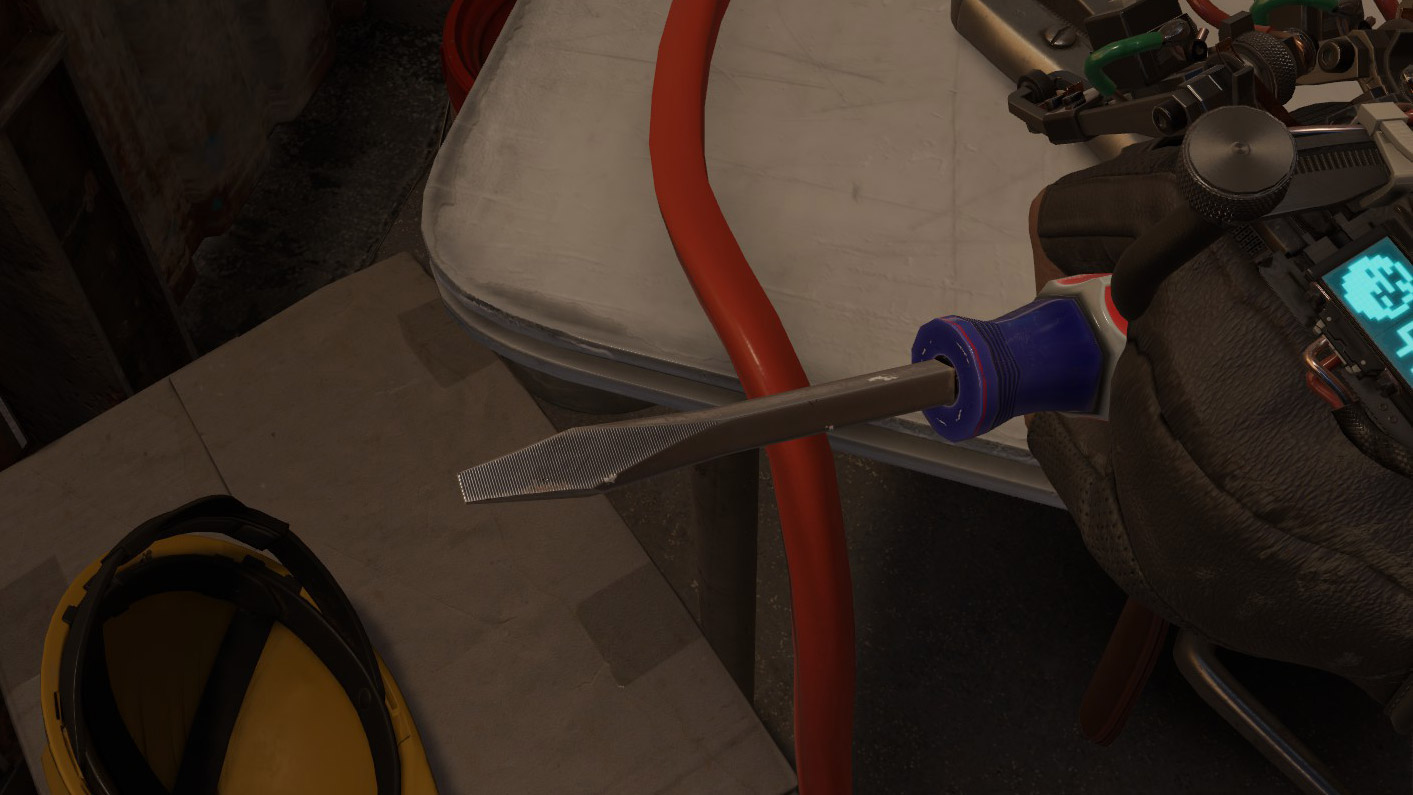
With the right content, looking through the lenses of Varjo Aero feels like looking at the world with new eyes. Within minutes of donning the headset, I saw details in Half-Life: Alyx that I couldn’t even see on prior-generation headsets, like the textured tip of a screwdriver.
The clarity of the Aero is so crisp that it easily reveals content that isn’t up to par; for the first time in Alyx I immediately noticed that the game’s chain-link fences are actually completely flat, largely thanks to the headset’s increased resolving power which enhances stereoscopy (or lack thereof).
This also has an impact on presence—that feeling when your eyes are being tricked into believing that what’s in front of you is actually there. While playing Alyx with Aero, there were several rooms I walked into where I just had to stop and stare… when the lighting was just right, it felt like I was actually standing there in that place. It’s an incredibly powerful feeling that goes beyond mere immersion, and Aero seems to elicit it more easily than any headset I’ve tried before.
Beyond virtually eliminating ghosting and glare, Aero’s lenses also make for an incredibly large sweet-spot which means that most of the image stays sharp even when you rotate your eyes away from the center. This is an absolute relief from most other Fresnel headsets which have tight sweet-spots that make things look blurry even if you move your eyes just a bit.
While Aero has incredible clarity, it’s image isn’t without flaws; there’s two things preventing it from looking like a near-perfect image. The first is chromatic aberration (the separation of colors), which stood out to me right away, even before explicitly analyzing the headset’s image quality.
This is surprising because chromatic aberration is rarely an issue on other VR headsets as it’s easily corrected in software. Varjo is either doing a poor job with their chromatic aberration correction, or there’s something about the lenses that make it a greater challenge than with other headsets. Hopefully the former, which would mean that it could potentially be solved with a future software update.
The other issue with Aero’s image is distortion at the extreme edges of the field-of-view. It’s subtle enough that if you aren’t moving your head you won’t notice it, but as soon as you start moving you’ll notice it due to the sensitivity of peripheral vision to ‘motion’. Other headsets also correct for distortions in software, and with Aero, most of the image is distortion free; given that it’s just on the edges, I’m less hopeful that this could be fixed with a software update.
The distortion doesn’t feel like a deal-breaker, but it’s a bummer that it detracts from what would otherwise be a nearly pristine view.
Overall: Here’s the thing about Aero. It’s clarity and resolving power is beyond the fidelity of most VR content to date. There’s less than a dozen VR titles in existence with the visual chops to really make use of Aero’s fidelity. Upgrading to Aero from any recent generation VR headset isn’t going to mean much if you’re playing Beat Saber, VRChat, or most indie VR titles; they simply weren’t authored with the necessary level of detail. But if you’re using a handful of applications where resolving power is crucial (like flight sims), Aero’s visuals will delight.
Field-of-View
Varjo quotes Aero’s field-of-view at “115° horizontal, 134° diagonal at 12mm eye-relief,” though my personal measurements fell well short of this, even when removing the facepad to get my eyes as close as possible. Here’s how it stacks up to recent headsets:
Personal Measurements – 64mm IPD
(minimum-comfortable eye-relief, no glasses, measured with TestHMD 1.2)
| Varjo Aero | Vive Pro 2 | Reverb G2 | Valve Index | |
| Horizontal FOV | 84° | 102° | 82° | 106° |
| Vertical FOV | 65° | 78° | 78° | 106° |
Personal Measurements – 64mm IPD
(absolute minimum eye-relief; facepads removed, no glasses, measured with TestHMD 1.2)
| Varjo Aero | Vive Pro 2 | Reverb G2 | Valve Index | |
| Horizontal FOV | 102° | 116° | 98° | 108° |
| Vertical FOV | 77° | 96° | 88° | 106° |
For such an expensive headset, the lack of eye-relief adjustment to maximize the field-of-view is a shame.
Even though the field-of-view is generally less than these other headsets, the large sweet-spot goes a long way toward making it feel larger than it is.
Similar to Vive Pro 2, the actual shape of the field-of-view doesn’t feel quite as round as some other headsets. Instead it feels slightly cropped vertically, a bit more at the bottom than the top.
IPD & Eye-tracking
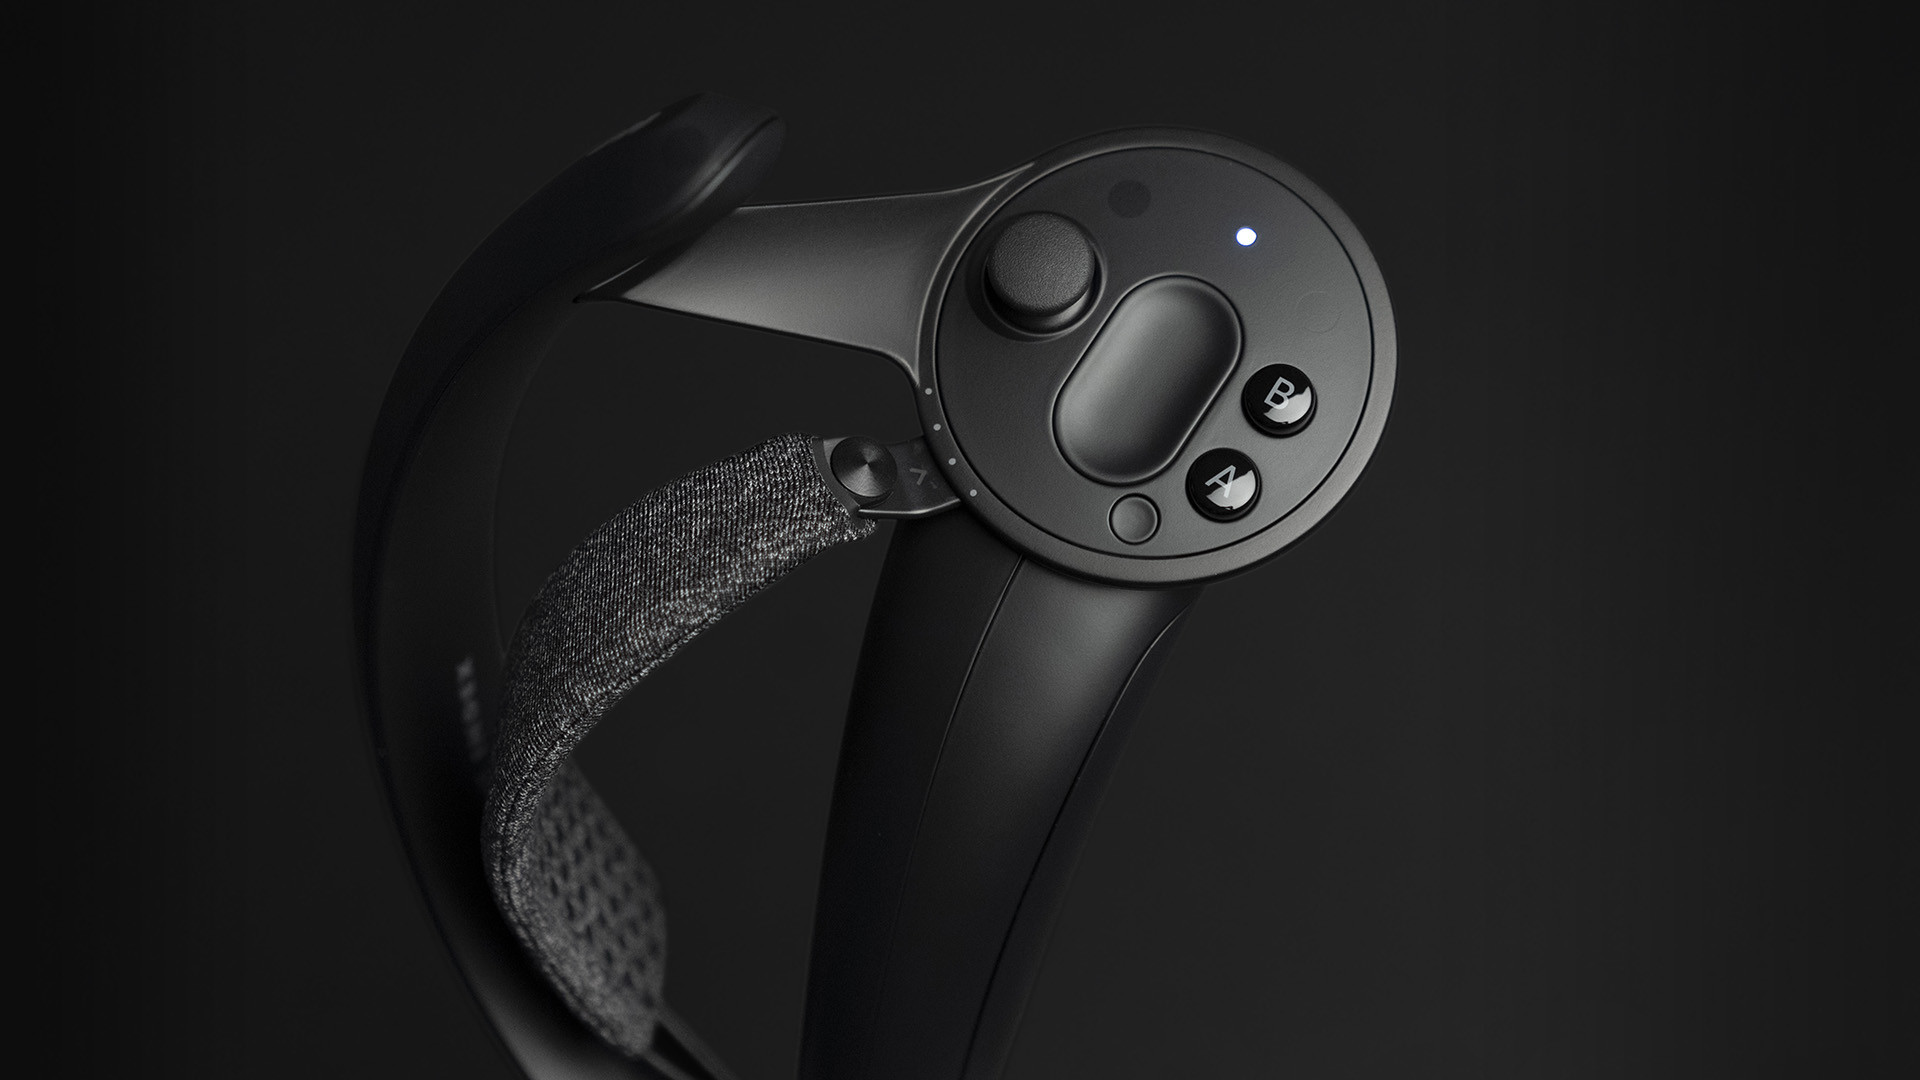
Varjo Aero includes the company’s 200Hz eye-tracking solution which is paired with an automatic motor-driven physical IPD adjustment that ranges from 57–73mm.
When you put on the headset you’ll be asked to stare at a white dot at the center of the screen for a few seconds to calibrate both the eye-tracking system and your IPD. If the IPD needs to be adjusted, you’ll hear the headset make a little whirr sound as the lenses slide quickly and easily into position.
You can see a readout of the measurement through the Varjo software (mine was spot on), and you can even manually set the IPD if you’d like, in 0.5mm increments.
The eye-tracking system in Aero can also be used for foveated rendering to increase rendering performance, but it’s only supported in applications that make use of the Varjo SDK (which are few and far between).
With Aero likely to reach a wider audience than the company’s more expensive headsets, it’s possible we’ll start to see more applications adapted to support the Varjo eye-tracking system—the company claims it’s fairly straightforward for developers using Unity or Unreal Engine.
In my limited testing with foveated rendering in Aero, I found it to be effectively invisible; the only time I could notice that it was even active is if the eye-tracking wasn’t calibrated correctly.
Continue on Page 2: Displays, Audio, Tracking & Controllers »
,
Displays
Varjo Aero uses a pair of mini LED LCD displays with a resolution of 2,880 × 2,720 per-eye at 90Hz. They are nice and bright at 150 nits, and Varjo says they’re calibrated to cover 99% of sRGB and 95% of DCI-P3 color space, which means a wide gamut and accurate colors. The mini LED backlighting offers decent black levels but still nothing close to the raw darkness of OLED.
Despite the impressive clarity of the lenses, there’s no screen-door effect (unlit space between pixels) to be seen on these displays. The only obvious tell that you’re actually looking at pixels is when you see some aliasing. If you’re really looking for it, you can find a faint bit of mura (inconsistencies in brightness and color from one pixel to the next), but it’s doubtful you’ll be able to spot it during real use.
Audio
For a $2,000 headset, Varjo Aero’s lack of onboard audio feels like a big miss. Yes, there’s some custom earbuds with a mic that will come included in the box (they weren’t ready in time for our review) that can plug into the headset’s 3.5mm aux port, but the extra friction of fiddling with earbuds or headphones is something we hoped would be left behind in VR’s first generation.
Tracking & (Bring Your Own) Controllers
Varjo Aero uses SteamVR Tracking 2.0 sensors (which are compatible with 1.0 or 2.0 base stations). Make note: the $2,000 price tag does not include base stations or controllers. You’ll need to shell out another $580 if you want to pick up Index controllers and base stations new, but because it’s all in the SteamVR Tracking ecosystem, you could use old base stations or controllers (like Vive wands) if you’d like.
Head-tracking with Varjo Aero is every bit as good as you’d expect from other SteamVR Tracking devices (which, if you didn’t know, is typically excellent and considered the gold-standard in the VR space).
No Light Leak (but Also No Passthrough)
Varjo Aero’s facepad creates an excellent seal that doesn’t let any light in, but it makes me realize how often I use the nose-gap in other headsets to find my controllers or headphones, or to click a few things on the PC without taking the entire headset off.
Something that feels missing on a headset of this price released in 2023 is a decent passthrough view, even if only to look quickly and easily outside of the headset.
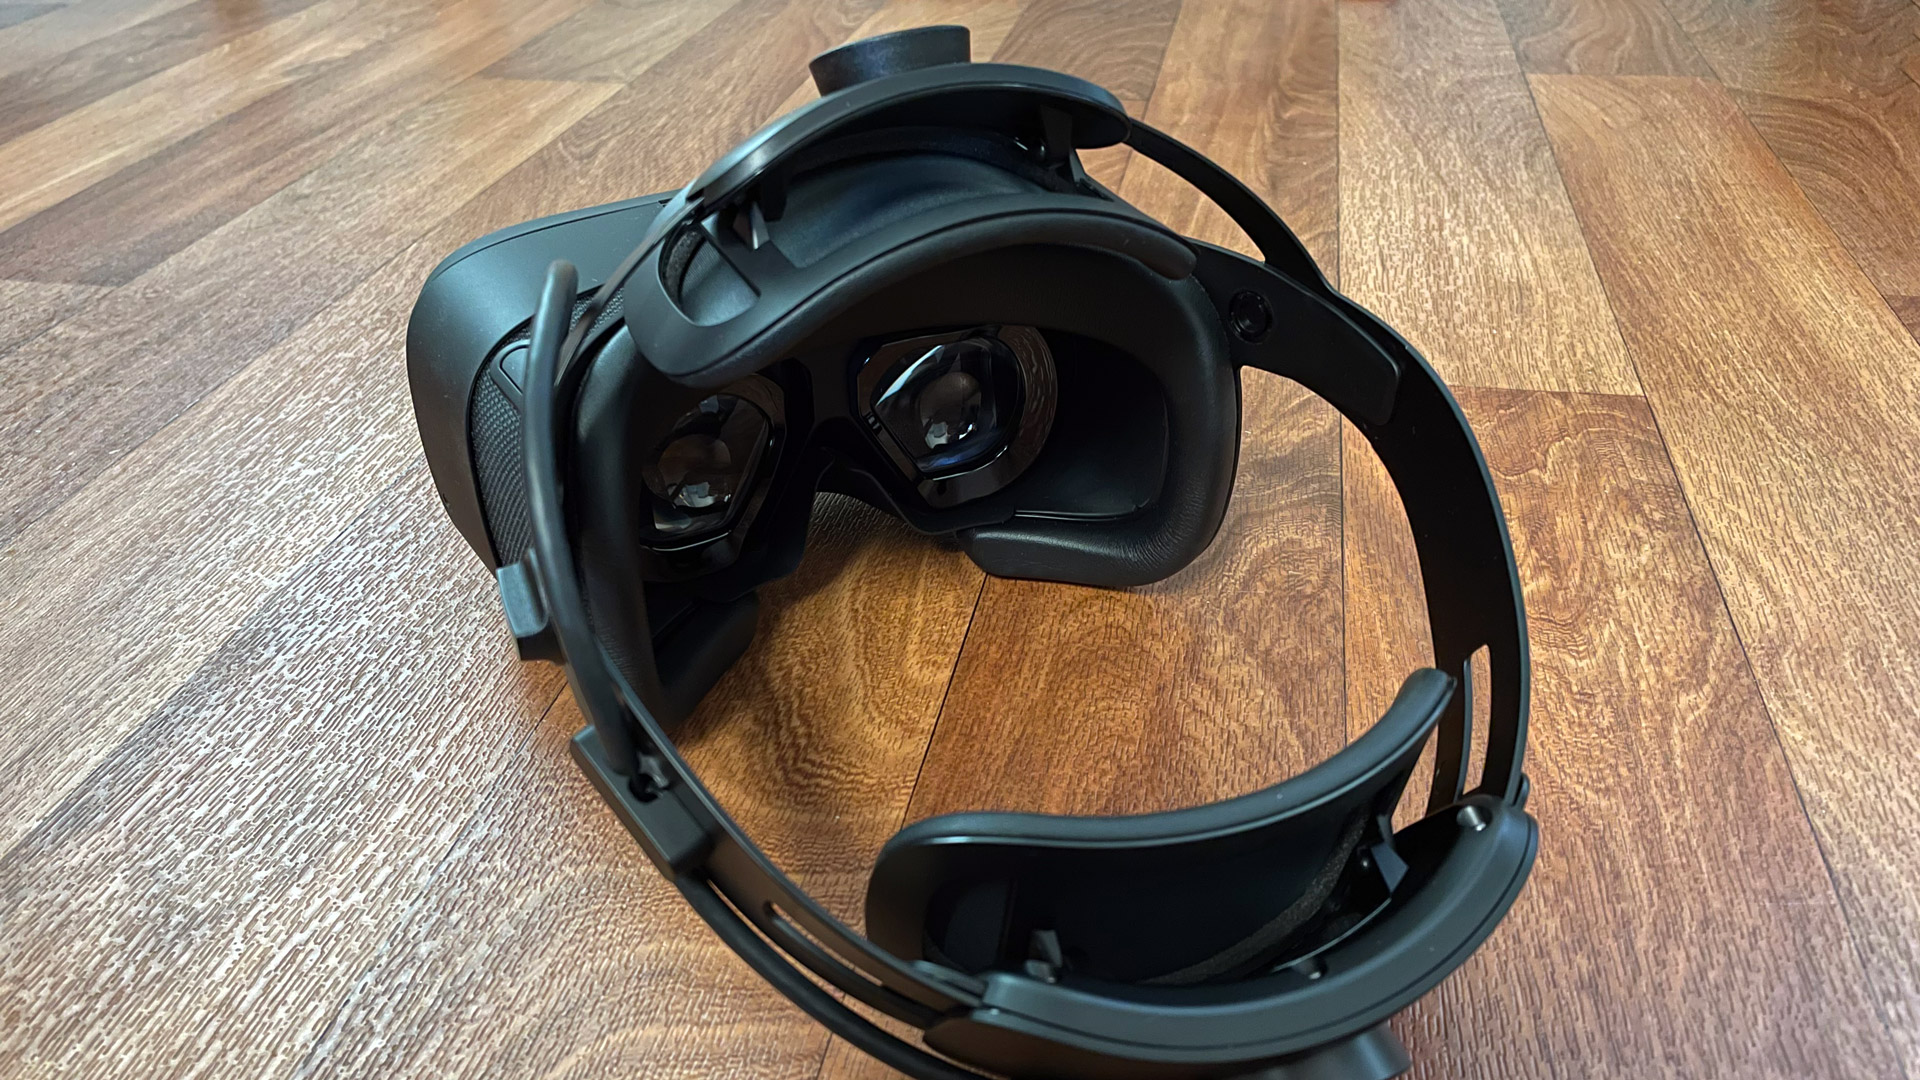
Fit & Ergonomics

Varjo Aero uses the same great headstrap as the company’s more expensive XR-3 and VR-3 headsets; it’s the best version of the ‘halo’ style headstrap that I’ve seen so far.
It’s got three core adjustments that offer a lot of flexibility in finding the right fit; there’s the usual dial on the back strap, but also one on the top strap which lets you easily adjust the front of the headset up or down. Additionally there’s two dials near your temples which work in tandem to change the angle of the display housing with regard to the rear strap. It takes some time to figure out how to find the most comfortable fit between these three adjustments, but the dials make it quick and easy to adjust on the fly.
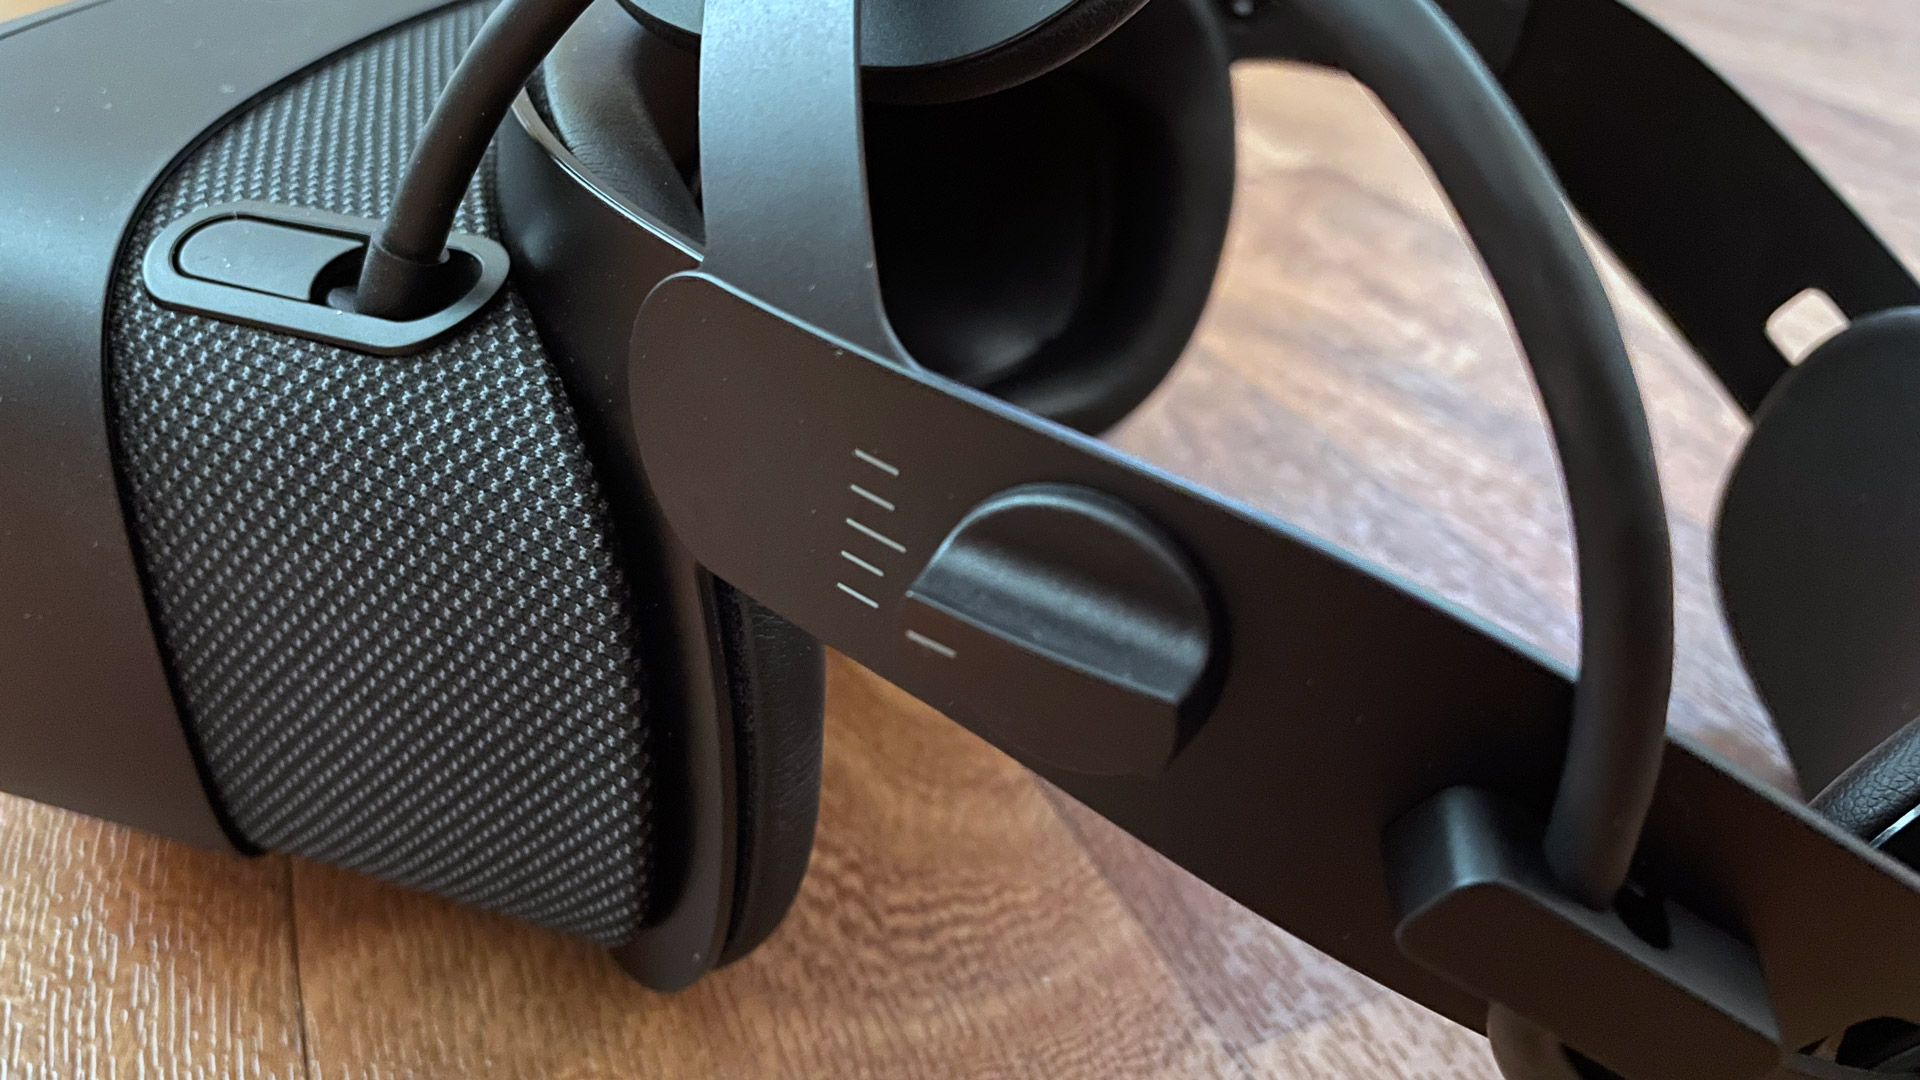
One thing I miss from some other headsets though (like Index and Reverb G2) is the ‘springy’ side struts which make it much easier to put on and take off the headset without re-adjusting the fit every time. Depending upon the way you adjust Varjo Aero, you may find that you need to loosen the rear dial every time you take the headset off which is fairly annoying because it requires two hands (both of which are probably already holding controllers). With some practice you can find a fit that allows the headset to come on and off a bit easier (donning from the back to the front seems to be best), but it’s less than ideal.
I don’t wear glasses myself, but given the way the headset goes on your head (best back-to-front), the headset isn’t as friendly to glasses wearers as headsets which can be put on front-to-back. I tried the headset with a small pair of sunglasses and it didn’t feel like there was much room for glasses in Aero.
Unfortunately Varjo Aero has no eye-relief adjustment, which we would have hoped to see on a headset at this price point. Without it, you can’t bring the lenses closer to your eyes to maximize the field-of-view or move them further away to make extra room for glasses.
Software Experience
Varjo Aero works fairly seamlessly with SteamVR, but its core software is called Varjo Base (which must be running for the headset to work).
In addition to a built-in virtual desktop, Varjo Base also includes a handful of useful configuration options and extra tools which are nice to see.
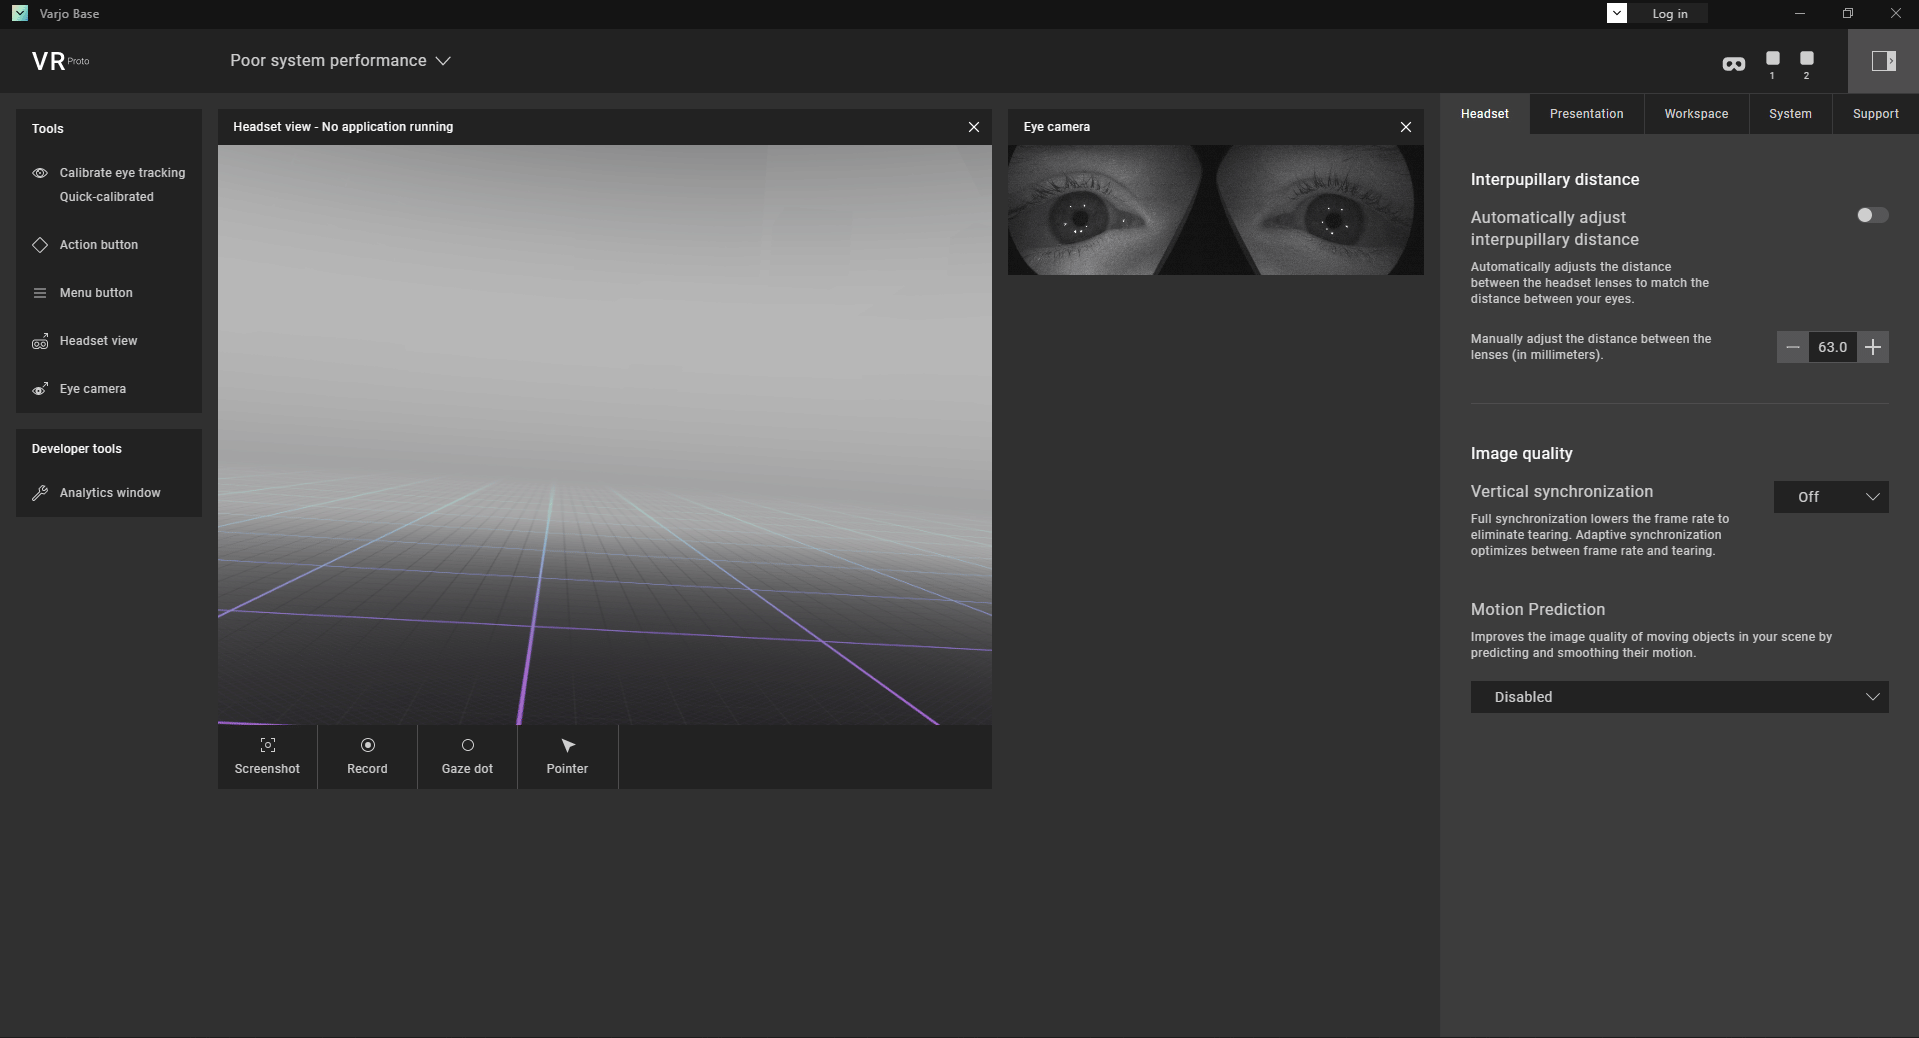
You can see a mirror of what’s being shown in the headset, look at the view through the eye-tracking cameras (creepy but cool), easily capture a screenshot or video, and even create a virtual pointer inside the headset’s view so that someone outside the headset can point to something inside the headset (surely useful for VR demos and tours).
 Using Varjo Aero with SteamVR doesn’t require any additional configuration beyond installing Varjo Base and then launching SteamVR. Once it’s running and SteamVR detects your hardware, you can launch SteamVR applications from your desktop or click your controller’s menu button to pull up the usual SteamVR dashboard and use all the features you’re used to.
Who is Varjo Aero For?
Not everyone, that’s for sure. Aero is too expensive to be casually recommended. If you aren’t a business that has a special use-case for eye-tracking or needs to maximize fidelity, or a simulation enthusiast that doesn’t blink at dropping thousands on sim hardware, this headset probably isn’t for you. Even though Aero offers another step up in clarity, a much more affordable headset like Reverb G2 is going to be a way more sensible option for 99% of individuals that are after maximum clarity.
Disclosure: Varjo provided Road to VR with an Aero headset.